" Software "

Delegated Calendars iCal

How to change the colours of Microsoft Office 365 Shared Calendars in Apple Calendar for OS X

UPDATE (1st May 2017): Several users have reported this tutorial no longer works in MacOS Sierra, I haven’t yet been able to test this myself yet as Apple Calendar is no longer my primary calendar app (I now use Fantastical 2). I will test and confirm this asap.

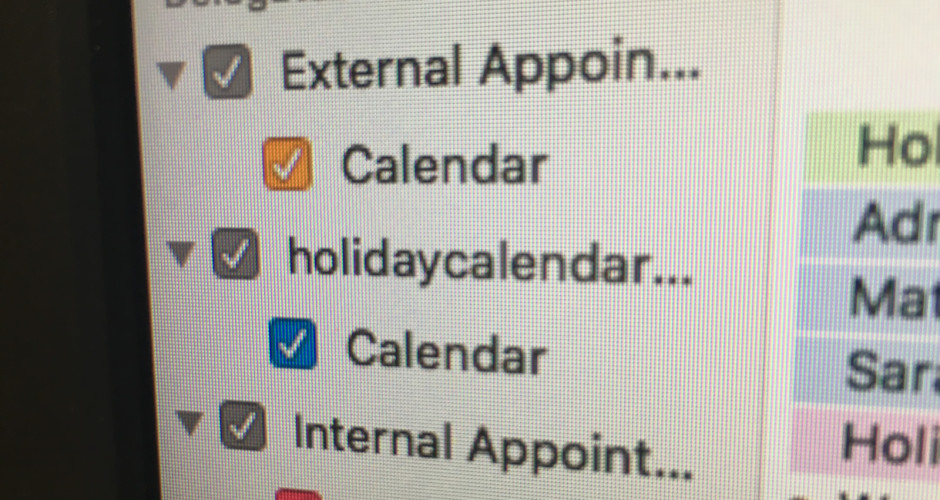
If you use Microsoft Office 365 and utilise the shared calendar feature you may have found that unless you are using Microsoft Outlook for Mac you aren’t able to access these calendars in Apple Calendar. For reasons that aren’t obvious, when you add calendars that you are a delegate for (see my previous article for how to add delegated calendars to Apple Calendar), you aren’t able to change the automatically selected random colour that the application assigns to it.

I’ve found many posts online with people asking the same question on how to change the colour, but so far no one seems to have found a way to do it (Google Apps users have reported that the colour can be changed by changing it on the web interface so it’s possible the colour feature is blocked because it can be set at the server level but for whatever reason Microsoft doesn’t do this). After some experimentation I’ve found a way to modify the colours to your own choice, it’s slightly technical so I’d advise only doing this if you are comfortable editing .plist files and using the Terminal, so if you are here is the tutorial:

Pre-requisites: This tutorial is based on OS X El Capitan 10.11.3 and the version of Apple Calendar that ships with it, these steps may work for older and newer versions of the Calendar app including iCal but I make no guarantees of this, experiment at your own risk. You will also need to have already setup your delegated calendars in Apple Calendar before getting started, click here to see my tutorial on how to do this. You should probably get the 6 digit hex code for your chosen color(s) before starting as launching Safari may open the CalendarAgent in the background and overwrite your changes, see the bottom of this article for a list of the default Apple Calendar Colour hex codes.

  1. Quit all your running applications (this is important as apps other than Calendar will call the calendar agent in the background).
  2. Quit Apple Calendar if you haven’t already.
  3. Make sure the CalendarAgent isn’t running in the background, open Terminal and run the following command replacing yourusername with the username of your OS X user account:
    killall -u yourusername CalendarAgent
  4. Open Finder and click on Go > Go to Folder and type ~/Library to browse to your library folder.
  5. Delete the following file: ~/Library/Calendars/Calendar Cache
  6. Delete the following file (if it exists): ~/Library/Caches/com.apple.iCal
  7. Browse to ~/Library/Calendars
  8. You will see a series of folders some of which end in .exchange, inside one of these folders click once to select the Info.plist and look at the preview of the content (or press spacebar to quick view the contents of the file if you don’t have preview switched on in Finder):
    Screenshot from Finder
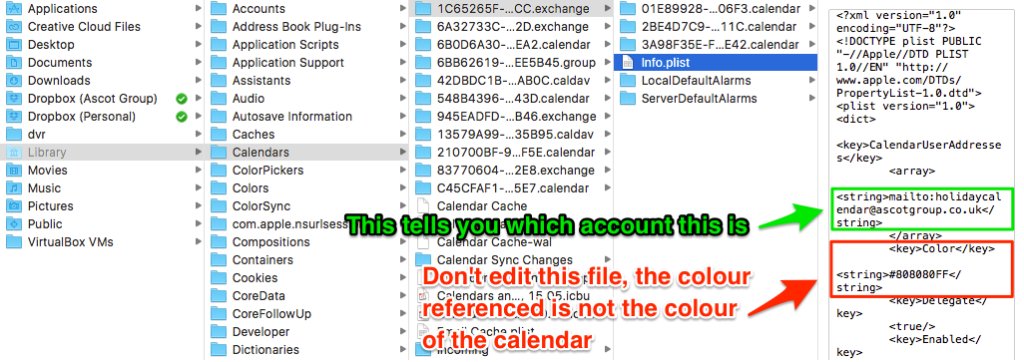
  9. Inside the same folder there should be another folder that ends in .calendar (if you have multiple .calendar folders look in the Events folder inside each of them, the active calendar will contain .ics files, the other folders should be empty), inside this folder there will be a plist file called Info.plist, open this file in TextEdit or the text editor of your choice (make sure you are inside one of the .calendar folders, both this folder and it’s parent .exchange folder have a file called Info.plist and it’s important you edit the correct file).
  10. Locate the line that says <key>Color</key>, the line below is should say something like <string>#1D9BF6FF</string>, replace the part that says #1D9BF6 (your color string may be different) ignoring the last two FF characters, these are not part of the hex code and need to be left as they are:
    Apple Calendar
  11. Save and close your Info.plist file and relaunch the Calendar app, it should come up with a loading bar while it rebuilds the cache and updates the calendar, once that has finished your calendar should now have your custom colour set on it.

Default Apple Calendar Colours (Hex Codes)
Red – #FB0055
Orange – #FB8208
Yellow – #FEC309
Green – #56D72B
Blue – #1D9BF6
Purple – #BF57DA
Brown – #90714C

How to add Microsoft Office 365 Shared Calendars to Apple Calendar for OS X

I’m not the biggest fan of Microsoft products, anyone who knows me will tell you how much I love my Apple products (ironically just 6 years ago I was an Apple-hater but am now one of their biggest fan boys!). The office I’ve been working at for the past year uses Microsoft Office 365 as their email provider, I helped them migrate from a 3rd party hosted Exchange solution to Office 365 and it hasn’t been without some really odd issues that defy common sense. I’m talking about issues that most Office 365 administrators have experienced, things that don’t work as common sense would expect such as the Office 365 Shared Calendars which are great as long as you are using Microsoft Outlook as your client.

We have 9 Mac users in the office, most of whom have switched recently from Windows and are happy to use the Outlook client to access their emails and calendars, but a few of us prefer using the native clients on OS X including myself. I recently switched from using Sparrow to Apple Mail and have struggled to get my shared calendars working in either Apple Calendar or my preferred client, Sunrise Calendar (despite Sunrise being owned by Microsoft it still doesn’t support shared calendars, a trait shared with the Microsoft Outlook for iOS/Android apps), so I’ve spent some time working out how to this and decided to share the information as I found it difficult to find on Google.

Pre-requisites

I’m using OS X 10.11.3 so the instructions are based on the version of Apple Calendar that ships with it but you should be able to apply these instructions to older versions of Apple Calendar/iCal although be aware some of the file paths might be different. You will also need Microsoft Outlook setup on a Mac or Windows machine with an account that has administrative access to Office 365 as this is needed to change the permissions on your shared calendars.

Granting users Permissions on your Shared Calendar(s)

Even though you may have already given a user access to a shared calendar via the Office 365 Exchange Control Panel (if you haven’t it’s probably best to do this before going any further) this won’t provide them with permissions that Apple Calendar uses to add delegated calendars!

  1. In Microsoft Outlook right-click on the calendar you wish to access in Apple Calendar and click Sharing Permissions:
    Microsoft Outlook
  2. On the permissions dialog you will need to add your user(s) and select what level of permissions they will have (they will need at least Read > Full Details permissions):
    Microsoft Outlook
  3. That’s it! Now the user(s) can add this calendar to Apple Calendar (repeat these steps for each calendar you wish to add).

Adding Calendars to Apple Calendar

  1. Open Apple Calendar and go to Preferences, click on the Exchange account and click the Delegation tab:
  2. Click on the + button and then type in the name or email of the shared calendar. Don’t forget to tick Show.
    iCal_Setup_-_Step_3
  3. You should now be able to see your shared calendar in Apple Mail, but wait why can’t we change those automatically selected colours? It turns out either by design or a long-standing bug that Apple Calendar stops you from changing calendar colours on calendars you don’t own. See my next article below to see how you can manually set colours of your choice.

Next Steps: How to change colours on Microsoft Office 365 Shared Calendars on Apple Calendar for OS X

Sparrow Mail: Finally a replacement for this awesome (but discontinued) email app?

Update (23/03/2018): I no longer use Apple Mail as my primary email client, I’ve started using Spark (https://sparkmailapp.com) and whilst the early versions have been very buggy and frustrating it’s now a fairly stable app and reminds me so much of Sparrow in it’s simple interface and uncluttered views. I still recommend reading this article and make up your own mind but certainly check out Spark!

When I first entered the world of Mac in 2012 a friend recommended that I use Sparrow as my email client which at that point was one of the most popular email apps for OS X, as a long time Gmail/Google Apps user it was perfectly suited to my workflow and introduced me to a new concept called ‘Inbox Zero’.

I love everything about Sparrow. It has a nice simplified user interface that is reminiscent of Twitter (perhaps it’s name has some connection with that?), is quick to load and has some clever little features built in such as a Dropbox integration that allow you to automatically upload files and attach a public link inside your email instead of sending the file directly, great for getting around mail server attachment limits (alternatively you could use box.net for the same purpose). It also has great support for Gmail with label support and an archive button which moves your email to the All Mail folder.

Only 6 months after I started using Sparrow and it’s companion app on my iPhone the Sparrow team announced they had been acquired by Google, great you might think, now Gmail had a brilliant desktop app that would only be improved now they were behind it. Not so. Google have a history of buying out some great apps and services for the people that built them and the skills they can contribute to the Google Team.

So from that point to now I clung on to my Sparrow, I slowly watched my friends switch to Apple Mail, accepted the last minor bug fix update in October the same year, and then become the only person I know still using it.

That’s not to say I haven’t tried adopting a replacement, in no particular order here is a list of the clients I’ve trialled, bought or downloaded for free, that for one reason or another that I won’t go into detail in this post, have not replaced the features and User Interface which I know and love on Sparrow:

I’ve tried so many clients, and while I’ve really enjoyed using a few of them (Airmail, Mailpilot and Nylas N1 all came close) none of them have felt to me like they completely replace what I personally like about Sparrow. So until last week I’d accepted that I was going to become a bit like that person that we’ve all met who is still using a mid-nineties version of Lotus Notes while all his colleagues are all using Gmail or Office 365… that was until I decided it was time to force myself to change to a different client, and for me that was going to be Apple Mail! Part of this decision was influenced by the fact I’ve just rolled out Xink.io to automate email signature updates for our team and it only support Outlook for Mac and Apple Mail on OS X.

Just for a little background, I’m a reformed Apple hater who has become a complete Apple Fan Boy in a few short years, I’m constantly selling the benefits of the Apple eco-system to my friends, family and colleagues to the extent that I often get asked if I’m on commission! Despite this I’ve always bitched publicly about how much I hate the Apple Mail client even though I tend to prefer Apple’s own software over third party alternatives. Until recently I’ve felt that the team behind Apple Mail were stuck in the past and purposely have delayed making Apple Mail as good as the company’s other apps just to keep the old school Fan Boys happy, but all that has changed in the last 12 months.

Yosemite and El Capitan have brought some much needed upgrades and I finally think I’ve found my Sparrow replacement, albeit with some heavy customisation to make it look and feel more like the client I’m used to. There’s still a few features I can’t replicate without third party add-ons (Icon only Sidebar, Top Bar Notification Icon, Dropbox integration) but for now it will do until either someone brings out a client that better suits my needs or I decide to develop my own (unlikely to happen anytime soon)!

I’ve attached some screenshots below to show what my Apple Mail looks like in comparison to Sparrow:

AppleMail

Apple Mail, most buttons removed except for Sidebar Toggle, Compose, Reply All, Archive, and Delete


Sparrow Mail Client

Sparrow in it’s default configuration. Simple, concise and perfect for me!